Instructions for Manual Spreadsheets
IMPORTANT: When you first open the file it may say it is a “Read Only” file; however, when you save the file on your hard drive you will be able to make changes and work in the spreadsheet.
This accounting workbook includes:
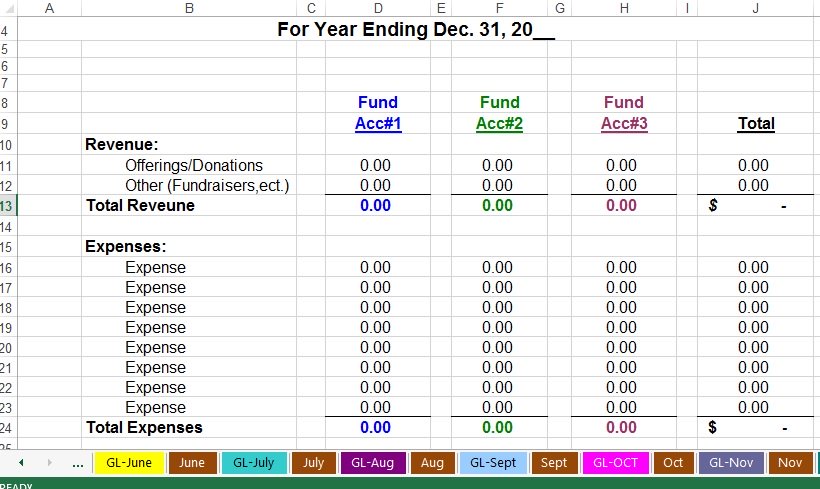
- 12 monthly general ledger
- 12 monthly reports
- 1 Annual Report
Unlike my regular accounting spreadsheets...only the annual report is a “view only” sheet. (A view-only sheet is one that is full of formulas and will automatically populate from data on other sheets.)
It is set up to carryover your monthly totals which means at anytime, you can look at how much you have spent in any account for the year.
I built these spreadsheets for small organizations and startup churches/nonprofits. I received several comments that my other spreadsheets were just too complex for some organizations and was too hard to modify to fit their needs.

Coupon!
Here is a 10% discount code for all the ebooks, spreadsheets, and packages on this site:
FCA
Note: click on "PACKAGES" in the top navigation bar for a list of all of the ebook and spreadsheet packages on this site!
Setting up the Manual Spreadsheets:

- SAVE an original copy.
- Look at the bottom tabs.
- Click on the tab named “GL-Jan”.
- Click on “Name” in Row #1.
- Type in your organization’s name-(All you “set up” on this first sheet will auto fill in the rest of the months’ general ledger worksheets).
- Type in your current year. Will need to repeat for remaining months and annual report.
- Type in funds (General Fund, Building Fund, etc.)-Row #7 (If you do not have 3 separate accounts you can either delete them or hide them for future use. To hide them, simply highlight the accounts you want to hide and right click your mouse; go down to hide and click. You would then need to do that to all the reports...but when you need the extra accounts they are there to unhide and use. OR if you want to delete them, see step by step instructions on how to delete and add columns and rows.).
- Put in beginning balances-Row #5 in the Jan GL. - (*Even though you will probably be starting in another month...the balances will carry forward)
- Look at the bottom tabs...click on the brown tab named “Jan”.
- Type in your organization’s name - Row #2 - (All you “set up” on this first report sheet will auto fill in the rest of the months’ “Monthly” report worksheets and also in the “Annual” report).
- Type in the name of the report- Row #3 -(This is an Income Statement. You can name it whatever you want though. Auto filled rest of months).
- Type in fund accounts-Row #8 and Row #9 (Auto filled in rest of months).
- Type in Revenue and Expense accounts. (Revenue accounts are only for example). (You only have to set up Jan. the rest of the months will auto fill).
- There are no formulas in this first monthly report so you can delete rows, add rows, change around the format...anyway you want to set it up. Only be aware that the line items on the following months have formulas in them to auto fill rest of the reports and annual report so if you change much you will have to hand set each month accordingly...which really isn’t that big of deal...so remodel to your heart’s content.
- SAVE one more copy! This one will be your original to use every year. Can delete original one not personalized now.
Church Accounting Package
A set of 2 ebook packages that covers the following topics...
- Fund accounting examples and explanations
- Difference between unrestricted and restricted funds
- Best methods for tracking restrictive funds
- Explanations and examples of financial statements for churches and nonprofits
- Minister compensation and taxes
- Payroll accounting and its complexities
- Much more - Click here for details

Entering Data:
Quick Lesson in Basic Accounting:
Click on first tab “GL-Jan”. Look at each “fund”. You will notice the account is set up in a “T” account with three parts: the title of the fund, expense and income. (These are single entry spreadsheets, so instead of debit and credit, I just put income and expense.)
So:
- This is a basic general ledger. You just enter revenue and expenses as you would in a paper ledger.
- At the end of the month...click on second tab and fill in monthly report. I used to print out the GL and highlight in different colors the different line items. Whatever works for you.
- Remember the Annual Report is a view-only sheet and will automatically fill in as you complete each month’s report...unless you did some major remodeling...then you will have to manually fill in the numbers.
*Notice: Want to add or delete rows in the general ledger?
- Example: Say I needed 2 more rows; I would click on any row. Go up to the toolbar. Click on “insert” twice for 2 more rows. Notice there are empty cells now in the “balance” column. Click on the last row with numbers in it or you can also select (highlight anywhere in the number row) the number of rows you need, right click, insert. (example:click on the number 14, hold your mouse button down and “select” rows down to number 21, right click, insert.)
- Notice the little black box on the bottom right corner of that cell. That is your “Fill Handle”. Put your mouse pointer over it. Notice how the pointer goes from a fat white plus sign to a skinny black plus sign. That means your fill handle is ready. Click and pull down to the end of the empty rows. Your formulas are now set.
- To delete rows, click and highlight the rows you want to delete. Hit delete on keyboard or on editing ribbon. Notice that from that point down in the “balance” column says “REF!” Click on the last cell with a number in it. Pull fill handle down to the black line. All of the rest of the formulas are now set.
**Recommendation: Print out the general ledger and monthly report each month and keep in a binder.
Also, I would recommend backing up your data once or twice a month and storing in a separate location from your original.
Click here for instructions on modifying and customizing your basic accounting spreadsheet.


