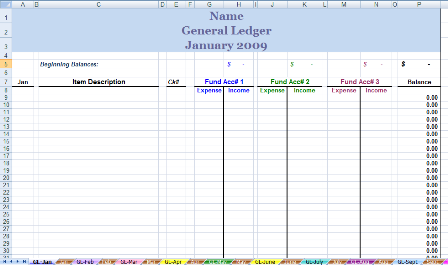
Add/Delete Funds in Manual Accounting Workbook
Let’s start out with some basic excel tips for customizing your free manual excel spreadsheet.
- SAVE an original copy.
- Look at the bottom tabs.
- Click on the first tab named “GL-Jan”.
Give the Heading Some Personality:

Color:
- Select the Heading. (Click on cell A1 and holding the button down go down to cell A3)
- Click on the drop down list(pointing down arrow) on the fill color icon (looks like a tipping paint can).
- Choose which color you want for your heading.
Font:
- Your heading should still be selected (if not…see instructions above).
- Click on the font color drop down list (looks like a “A”) and choose font color.
- Click on the font drop down list and choose font.
- Click on the font size drop down list (next to the font) to choose size.
Adding or Deleting Fund Accounts:
You can delete the funds you don't need or you can simply hide them to use later...
Highlight the accounts you want to hide and right click your mouse; go down to hide and click. You would then need to do that to all the reports...but when you need the extra accounts they are there to unhide and use.
Delete Fund Account Columns:
- Select the columns that you want to delete. (Click on the letter of the columns you want to delete and hold the left button on your mouse and highlight all columns you want to delete)If you are just taking out 1 column, you would highlight columns I-L.
- You can either right click and click on Delete, or...on the Home tab, in the Cells group, click the drop down arrow next to Delete, and then click Delete Sheet Columns.
- Now correct your formulas in the balance column: select (click on) the last cell in row 5.
- Click the F2 button on your keyboard, select the #REF!+ for all the fund accounts you took out in the cell formula, click delete, then enter on your keyboard.
- Select the last cell in row 9, click F2, select the -#REF!+#REF! for all the columns you deleted, click delete, then enter.
- 6. Select the last cell in row 9 again, click F2. Your formula should now be the total beginning balance (last cell in row 5) minus all the expenses in row 9 plus all the incomes in row 9 (not necessary to be in that order)
- Select the last cell in row 10, and follow directions in step #5.
- Select the last cell in row 10 again, Notice the little black box on the bottom right corner of that cell. That is your “Fill Handle”. Put your mouse pointer over it. Notice how the pointer goes from a fat white plus sign to a skinny black plus sign. That means your fill handle is ready. Click and pull down to the last cell in row 33.
- Select the last cell in row 35. Follow instruction in step#4. Your formulas are now set.
Add Fund Account Columns:
- For each fund account you want to add...you will need to insert 3 columns.
- To insert multiple columns, select the columns immediately to the right of where you want to insert columns. Select the same number of columns as you want to insert.
- For example, say you wanted to add 2 additional fund accounts You would select columns I-N and either right click and click on Insert or...on the Home tab, in the Cells group, click the arrow next to Insert, and then click Insert Sheet Columns.
- Then highlight (select) columns O-T, click copy, select column I, and hit enter.
- Rename fund accounts and select different font color.
- Set formulas: select the last cell in row 5 (beginning balances),hit F2, hit the plus sign on your keyboard, then click on cell for the new fund account, repeat for additional funds, and/or hit enter to set formula.
- Select the last cell in row 9, click F2, hit minus J9 plus K9 minus M9 plus N9, click enter to set formula.
- Repeat step 6 for next balance cell in row 10 except it will be – J10 + K10 – M10 + N10.
- Select the last cell in row 10 again, grab fill handle and pull down to the last cell in row 33.
- Select last cell in the balance column (yellow box) and hit F2, click the plus sign on your keyboard, then click on the monthly balance cell in row 35 for the new fund account, click + for additional funds, and/or hit enter to set formula.
Spreadsheet Package
This spreadsheet package is designed for churches and nonprofits.
It includes:
- Contribution Tracker;
- Automatic Accounting (tracks income and expenses for up to 5 funds);
- Bank Reconciliation (reconciles accounting workbook to your bank statements);
- Collection Count sheet;
- Mileage log;
- Travel reimbursement
- Customizable Word doc with a Cash, Noncash, and a Quid Pro Quo Contribution Receipts.

Coupon!
Here is a 10% discount code for all the ebooks, spreadsheets, and packages on this site:
FCA
Note: click on "PACKAGES" in the top navigation bar for a list of all of the ebook and spreadsheet packages on this site!


