
Instructions for the
Contribution Spreadsheet
First: Set Up!
Please see this tutorial before you start the setup and start using this spreadsheet: Contribution Tracking Workbook Tutorial

- SAVE an original copy.
- Look at the bottom tabs.
- Click on the second tab named “Total”.
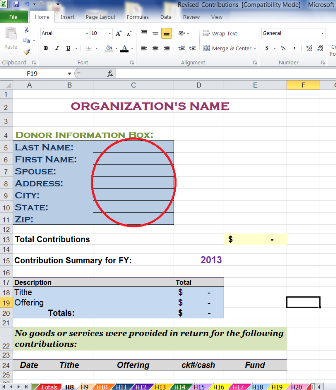
- Type in your organization’s name. That is all the information besides the year that you will enter on this worksheet...all the rest of the data will auto-fill from the information you enter on your donor worksheets.
- You can also change the headings on this page if you need to. For example you can change "State" to "Providence". It will auto-fill to all of the donor worksheets.
- I have added "GO TO" buttons, so you can click on the button and go to that donor's page.
- You can change the wording on the button by clicking in cell B7, hitting the down arrow and type word. Do the same for each button. Clicking on button will just take you to that worksheet.
Imput Donors
- Click on the third tab named “H8”.
- Type in your donor’s information. Will auto-fill on the Total Contribution worksheet.
- Type in remaining donors on their individual worksheets.
- SAVE one more copy! This one will be your original to use each year.
Imput Donations
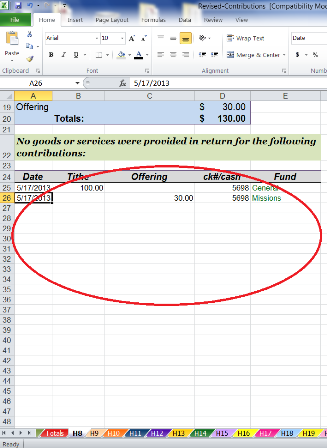
You will ONLY enter data on the bottom portion of each donor's worksheet as shown in the picture above. All of the rest of the cells will auto-fill from the data you enter there.
- Date
- Record amount of contribution in either the tithes or offerings column
- Record check number or cash
- Record designated fund such as general, missions, building, etc
Spreadsheet Tip...

You can change the currency symbol on each spreadsheet by selecting the cells you want the symbol to be in.
Then on the Format menu:
- Click "Cells"
- Click the Number tab
In the Category box:
- Click Currency
On the Currency symbol pop-up menu, click the currency symbol that you want.
Adding Additional Worksheets (Donor Tabs)
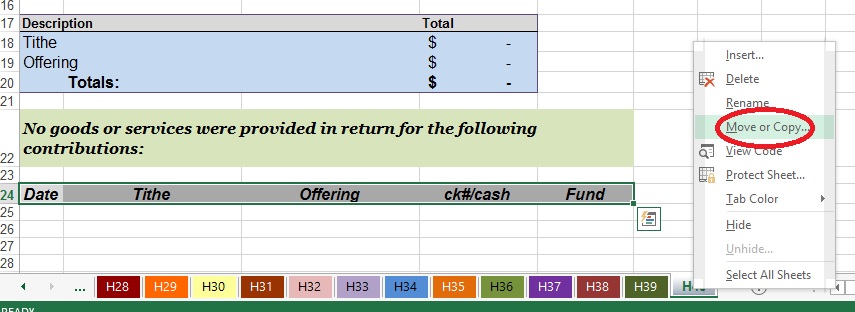
- Right click on last tab
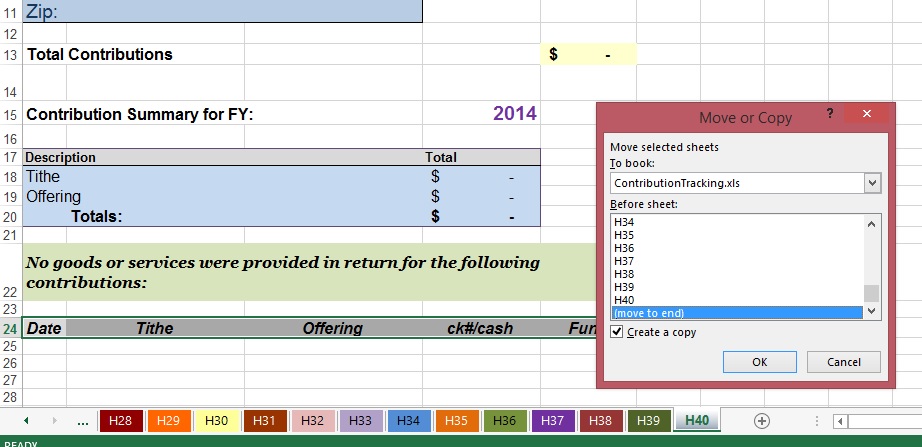
- Go to "Move or Copy"
- Click little box next to “Create a copy”
- Pull down list and click on “move to end”
- Click OK
- Tab will say H40 (2)
- Right click on tab and rename to H41 or name of donor such as JSmith
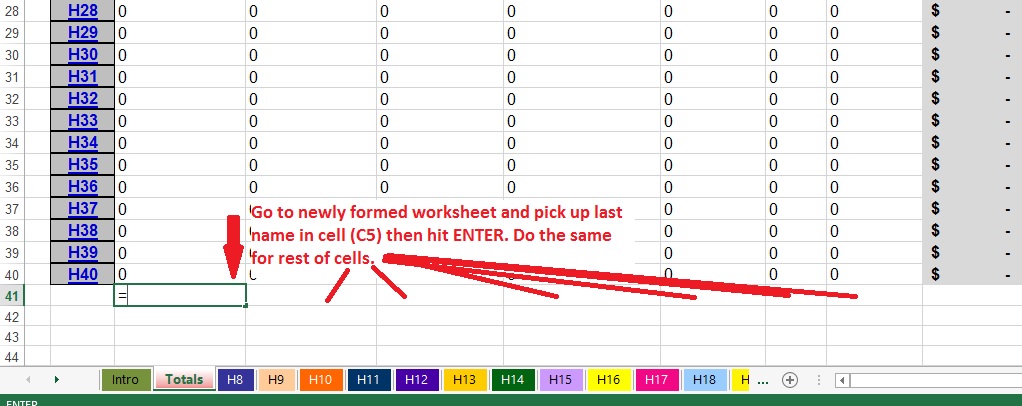
- Go to "Total" worksheet
- If you haven't done it already...unprotect sheet (Click on the Review tab and click Unprotect Sheet. There is no password. )
- Go to row 41
- Click in the "Last Name" field (cell C42) in the
third column (C) - Hit the “Equals” sign on your keyboard
- Go back to newly created worksheet (H41) and click in the "Last Name" Cell C5
- Hit “Enter” key
- Repeat for each field in the informational box.
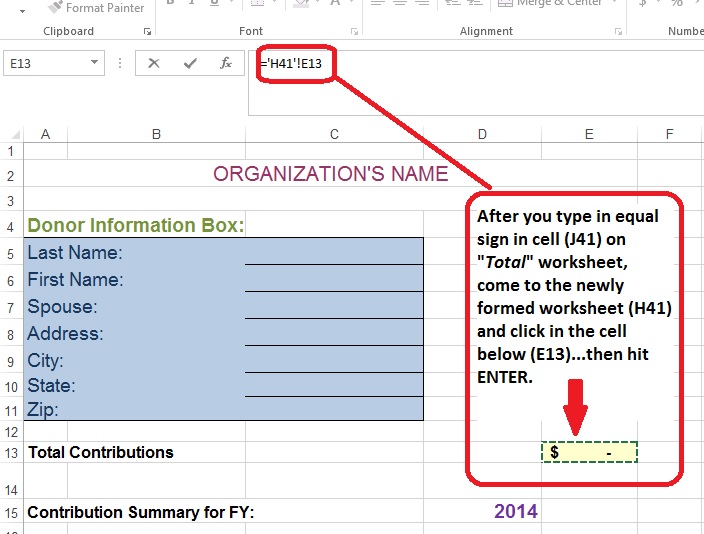
Don't forget to pick up the total by following the following steps:
- Go to "Total" worksheet
- Click the Total cell (J41) in “Yr Total” column
- Hit “Equals” key
- Go to new sheet (H41) and click in cell E13
- Hit “Enter” key
Now create "Go To" button:
- In cell (B41), type H41 or whatever you want to name button
- Click anywhere in worksheet then click back into cell (B41)
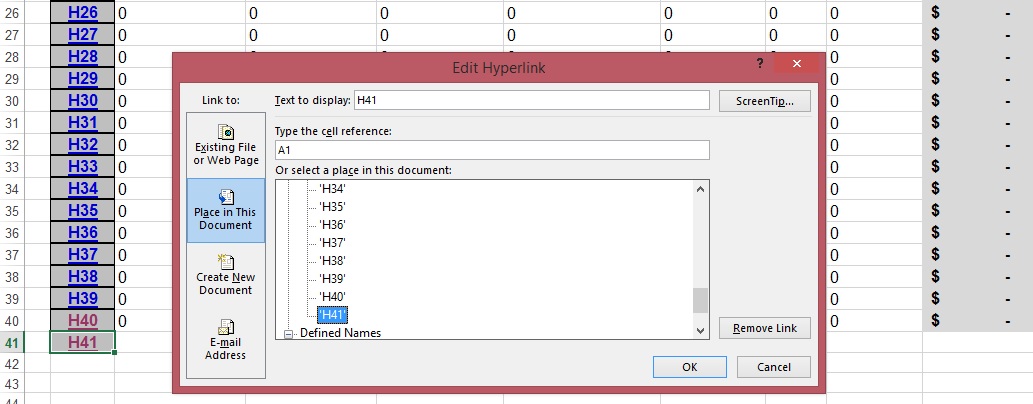
- Go to the Insert tab and then click on the Hyperlink icon
- The pop up window pictured above will pop up
- Click the "Place in This Document" button in the "Link To" pane on the left side
- Click on the newly formed sheet (H41)
- Click OK
- You can make font larger, bold, and center the text in the "Go To" button to match other buttons in the Home tab
Repeat above steps for each new sheet.
See how to receive, record, and acknowledge contributions per IRS guidelines in my book:
To put in alphabetical order or any order desired:
AFTER you have built your new worksheets and connected them to a row in the Total worksheet (see steps 8-13) :
To rearrange worksheets...simply click on and drag the selected sheets along the row of sheet tabs then release the mouse button where you want it to appear. (See these instructions for different methods to move worksheets)
To put last names in alphabetical order in the Total worksheet...
1. Highlight all of the data for donors starting with row 8
2. Go to Data> Sort on the taskbar
3. Select which column you want to sort from the drop box (for example, if you want to sort by last names, select column A)
4. Choose the order. If you want to sort from A-Z, select "Ascending or A-Z"
(See this page for additional instructions on sorting data in a range in Excel)
****Recommendation: Back up your data once or twice a month and store in a separate location from your original.

Coupon!
Here is a 10% discount code for all the ebooks, spreadsheets, and packages on this site:
FCA
Note: click on "PACKAGES" in the top navigation bar for a list of all of the ebook and spreadsheet packages on this site!
Quick Links: Home | Blog | Newsletter | Free Spreadsheets
Products: Church Accounting Book | Church Accounting Package | Spreadsheet Package
Support: FAQ | Church Accounting FAQ | Contact
Site/Company Info: About | Terms of Use | Site Map
By Vickey Boatright Richardson Copyright © 2008-2025 All rights reserved